Tag Archives: almonds

Indian-inspired Chicken with Almonds and Raisins

23 Sep

As I was craving for Indian food after a bad experience at the best Indian restaurant here in Munich, I decided to take things into my own hands and cook my own Indian meal a couple of nights ago. While at a local Indian restaurant about a month ago, I got really mad cos I paid €15 for my meal and all I got was a mountain of rice (horror of horrors!) and six small pieces of chicken. No vegetables, just two cashew nuts and maybe six raisins! And people pay for this! Okay, the quality of the ingredients used was good but prices here are getting ridiculous.

Last weekend, I found some time to cook a chicken dish from one of my favorite Indian cookbooks – Healthy Indian Cooking by Shehzad Husain – but not being prepared, I had to improvise with what I had in the refrigerator. Nevertheless, I must say, this was definitely much better than what they serve in some restaurants. And not only that, it was much lighter and therefore friendlier on the stomach.

The yoghurt with its tanginess contrasted well with the mellowness of the chicken breasts while the sweetness of the raisins and nutty almond slices rounded off the whole dish.  Yes, there are raisins in this dish – just don’t put in too many. The amount given below has been adjusted.

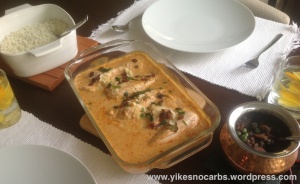
Chicken with Almonds and Raisins


To accompany the chicken dish, I made cauliflower rice and a peas and carrots dish as a side.


Indian-inspired Chicken with Almonds and Raisins (serves 4)

4 large chicken breasts without skin, about 600 gr total
8 Tbsp/250 gr thick yoghurt eg. Greek yoghurt
1 clove garlic, pressed
1 Tbsp tomato purée
1/2 tsp garam masala
1/4 tsp ground fennel seeds
3 cardamom seeds
2 tsp ground almonds
1/2 tsp chilli powder
1 Tbsp lemon juice
1/4 tsp saffron threads or tumeric
salt, pepper
1 Tbsp oil
1 bay leaf
1 cinnamon stick
1 Tbsp raisins
2 Tbsp sliced almonds
Chopped coriander leaves

Make slashes in the chicken so that the marinade will get into the flesh. Lay the chicken in a layer in a shallow baking dish. Sprinkle lightly with salt and pepper.

Mix the yoghurt, tomato purée, garlic, garam masala, fennel, cardamom pods, ground almonds, chilli powder, lemon juice and saffron/tumeric with 4 Tbsp water. Add salt to taste.

In a saucepan, heat some oil and fry the bay leaf and cinnamon stick till fragrant – this takes about 1 minute or less. Add the yoghurt mixture and another 2/3 cup water and bring to a boil. Cool slightly and pour over the chicken. Cover and let marinate for about 1 hour.

Preheat the oven to 180 degrees C. Sprinkle the raisins and almonds over the chicken before shoving into the oven. Bake uncovered about 20-25 min. Check doneness of chicken. Depending on how thick the chicken breasts are, you may need more baking time. Garnish with coriander and serve.

Chicken with Almonds and Raisins


PS. I used Beta Sweet carrots in the carrot dish. They were really sweet and turned purplish on cooking.

Nutritional Information

Calories: 244.2 kcal; Fat – 4.8 gr; Carbs – 8.5 gr, Protein – 41.8 gr

Print this recipe – Chicken with Almonds and Raisins

Low Carb Wheaten Scones/Bread

25 Nov

Low Carb Wheaten Scones

Looking through my bread recipe collection, I came across a recipe for Irish Wheaten Bread given to me by an Irish lady I met a long time ago and to whom I have since lost contact. I’ve made this bread a few times and although it has always turned out perfect, just like the lady demonstrated to a group of us, it wasn’t favourably received at home because it was a bit sweet and had more of a cake-like rather than a spongy texture like regular bread (yeast is not used). I, on the other hand, enjoyed it very much but having to consume the whole loaf by myself was a bit much. This type of bread doesn’t keep moist for long and is best eaten fresh out of the oven.

Since there was a possibility of making these into Wheaten Scones ie. smaller portions, I chose this recipe to redevelop into a low carb version.

The end result is a scone which comes close to the original and which I can finally enjoy with butter. I don’t quite like butter with my Low Carb Sunflower Seed Loaf which is now a breakfast staple in our home. With these scones you need to slather butter or cream cheese on them! Low carb sinning! Continue reading

Inconsistent Nutritional Information – What’s right?

14 Oct

Do you like me, look at the nutritional information on the back of food item packagings before purchasing? I do – to check the carbohydrate count in an effort to keep down the amount of carbohydrates I eat.

As I do this more often and become more familiar with the amount of carbohydrates a particular item is ‘supposed’ to contain, I have come to realise that there are inconsistencies. One producer will list a figure and another will have a figure waaaay off! We are not talking about small differences but sometimes double the amount.

I’ve already come across 3 food items where I’ve ask myself, so now, who is correct? And I’m talking about comparing ingredients in their most basic form where nothing is added and comparing weight for weight.

For example, almonds. Looking randomly through websites from 3 countries listing nutritional information for 100gr raw almonds, these were the values. A UK website called Weight Loss Resources states that 100gr of raw almonds contains 8.1 gr carbohydrates; the nutritional information on the back of the almond packet I always use says 100g raw almonds contains 9.4 gr carbohydrates, while Spark Recipes, the website I use to calculate the nutritional values of my recipes, says that 100gr raw almonds contains 19.7 gr carbohydrates. I have come across others which say 21gr or 22 gr carbohydrates per 100gr and these are usually American websites. That’s double the amount!

Same with dried apricots. I bought a packet of organic dried apricots not too long ago from a supermarket here in Munich which listed the carbohydrate content of 100gr as 39 gr carbohydrates. According to American online retailer Nuts Online, 100 gr organic dried apricots have 72.5 gr carbohydrates! Healthy Supplies based in the UK have apricots with 58 gr carbohydrates per 100 grams. Again, a huge discrepancy.

Yesterday, I had another shock. The brand of soy flour I use, produced by a reputable German organic products manufacturer called Sobo, says that 100gr of soy flour contains 3.2 gr carbohydrates. Spark Recipes’ calculator says 35.2 gr carbohydrates – that a whopping 32 gr difference! I’ve surfed around and there are other sites which say that soy flour has 3+ gr of carbohydrates and a lot more which say that it has 30+ gr of carbohydrates. And this has nothing to do with whether the soy flour is full-fat or defatted.

Obviously, if I am using 3.2 gr carbohydrates per 100gr in my calculations, the final carbohydrate value of my recipe will be a lot lower than if I were to use 35.2 gr!!

These are just the 3 inconsistencies I noticed. There must be many more items like this. We are fed with all kinds of information, right and wrong, and are often misled without being aware of it. So although I do try to be accurate when I do my nutritional calculations, I may not be giving you the right information. For me though, I think what is important is how my blood glucose values react to the meal I have consumed – if my values are acceptable, then I’m happy!

Low Carb Sunflower Seed Loaf

27 Jun

After putting off posting a low carb bread loaf for so long, I’ve decided that this recipe below is good enough to share. I’ve been playing around with ingredient combinations for months, sometimes even forgetting to take note of what went in and this one is by far the best – to me at least. One thing I’ve noted and had problems with is the rising. At times, the bread will rise beautifully and at times, not much. That’s when the end result will taste gummy. Sometimes the gluten will get stringy and sometimes, it mixes in nicely. A tad more water may make the difference. I’m now so satisfied with the outcome of this bread I don’t experiment anymore. The problems with stringy gluten strands in the bread have disappeared after so much practice. Whatever you do, don’t use the bread machine, just put all the dry ingredients in a bowl and stir in the warm liquid gently with a spoon. Then use your hands to knead lightly into shape. Don’t overknead.

I now throw  in a handful of sunflower seeds and 1 tsp chia seeds everytime I make the bread. I’ve also put in some millet – but only because I was trying to get rid of the leftover millet in my pantry. Millet is  not exactly a low carbohydrate item. Other suggestions are sesame seeds and pumpkin seeds. You might have other ideas.

Low Carb Sunflower Seed Loaf

100 gr flaxseed meal

100gr finely ground almonds

30 gr soy flour

10 gr wheat bran

200 gr gluten

1 packet yeast (9 gr)

1 tsp salt

1/2 cup sunflower seeds

Optional: chia seeds, sesame seeds or pumpkin seeds

250 ml lukewarm buttermilk

150 ml warm water

Heat your oven to about 50 degrees C for 10 min and turn off the heat.

Put all the dry ingredients in a bowl and stir to mix. Add the buttermilk and water and stir gently. If it looks like the liquid is not enough, add more water bit by bit till you are able to form a nice ball.

You can either put the ball on a baking sheet lined with parchment paper or put it into a loaf pan lined with parchment paper like illustrated below.

I’ve also tried baking with a silicon loaf pan. I usually advocate baking low carb items with silicon wherever possible due to the ‘non-conventional’ ingredients which tend to stick heavily – except in this case. Although the bread literally fell out of the pan without any sticking after baking, the shape was something else. During the rising process, because the dough was heavy, it pressed against the sides of the wobbly silicon pan and expanded sideways. So although there was nothing wrong with the end product, it looked out of shape. If you don’t mind, then do use silicon because it is a blessing.

Cover the pan with some tented aluminium foil and put it into the warm oven (switched off!) and leave the bread to rise for 50 min.

Once the bread has risen, take off the foil, close the oven door and turn on the oven to 180 degrees C. Bake the loaf for 55 min. Take out and let cool.

Tips:
* You can also slice the whole loaf and freeze it, taking out the amount you need the night before. I usually freeze half a loaf and once the first half is eaten up, I will defrost the next half overnight in the fridge.
* I would not recommend leaving this bread outside on the kitchen counter for too many days. It depends on the temperature. I left half a fresh loaf out in June when the day temperature was about 25 degrees C and it was covered in mold within 2 days. I must admit it was quite warm in my kitchen and I stupidly recycled a plastic bag which I had used for another loaf of bread. Now I’ve learnt. This bread is moist and this makes it a wonderful breeding ground for mold. However, if properly handled (like in the previous tip), you can enjoy this for up to 2 weeks.

………….

Nutritional Information – per slice if cut into 22 slices, without the optional seeds

Total calories – 115.2 kcal; fat – 6.8 gr ; carbohydrates – 2.6 gr of which dietary fibre is 2.3 gr ; protein – 10.5 gr

Total carbs for the whole loaf is 57.2 gr.

Print this recipe – Low Carb Sunflower Seed Loaf

Low Carb Marble Cake

29 Mar

I’ve been experimenting with a low carb marble cake for several weeks and here is the final result …

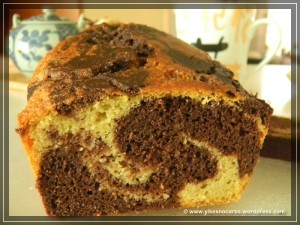
… a moist marble cake. This cake contains beans, coconut flour and almond flour but I haven’t called it Bean Coconut Almond Marble Cake because that’s a mouthful. Besides, you can’t taste the beans, coconut or the almonds. If you really pay attention, you will notice the light crunch of the coconut but it is minimal. The intention here is not to make a cake where you can taste the main ingredients but rather to produce a cake without using flour which ressembles the version made with flour. I think this cake is a lot better than many I have eaten here in Germany which have been crumbly and dry. It isn’t sweet so if you’ve got a sweet tooth, then increase the erythritol. Alternatively, a nice chocolate ganache frosting will probably do the trick as well.

In this recipe, beans replace the flour, namely white cannellini beans. In my experiments with beans, I found that it is not possible to substitute any type of bean freely as they have different consistencies when pureed. Some are drier than others. Sometimes it may work, sometimes not. If a bean substitution were made, it may be necessary to adjust the liquid in the recipe. I also found that beating the egg whites separately and folding them into the batter (as some cake recipes recommend to produce a lighter cake) does not make a great difference to the final cake so I have not made the cake this way.

This recipe has become a staple in our family and the best part is we can eat a slice – no, more than one slice – without feeling guilty.

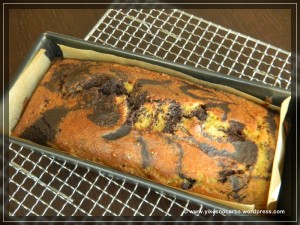
Baking Tip: I have baked several bean cakes in the past weeks and as mentioned in an earlier post, bean batter sticks badly to non-stick pans – well, mine at least, despite generous buttering. If you use a silicone pan, you will not have this problem so if possible, go out and buy one. If you already have a lot of baking pans, then the best thing to do would be to line them. Here is how I lined my non-stick baking pan. Click on the photo for a close-up view. I should have taken a photo without the batter in the pan but forgot. The instructions follow below.

Cut one piece of parchment paper wide enough to cover the width of the pan and long enough to cover the base and up both sides. Then cut another wide enough to cover the length of the pan, and again long enough to cover the base and sides. Butter the pan and ‘stick’ the parchment pieces onto the pan, one on top of the other – it doesn’t matter which goes in first. You will see that the corners are still left unlined. Just butter these areas well and bake your cake. When the cake is done, loosen the cake from the corners before turning it out of the pan.

One more thing – how did I arrive at this recipe? Well, yes, through trial and error (lots of trial and error!) but I did not start from zero and pluck figures from the air. This final recipe was arrived at by adapting a recipe found at Healthy Indulgences Blogspot here.  Since ingredients from different manufacturers and different countries react differently affecting taste and consistency, I have adapted it to produce the results I want using ingredients I am able to purchase here in Munich. I do hope that you will be able to achieve the same results. Do let me know how you do.

Low Carb Marble Cake – (15 slices)

1 420gr can white beans (15 oz), drained weight approx.240 gr

6 large eggs

130 gr (3/4 cup) erythritol

1/2 tsp stevia

1 tsp vanilla extract

1/4 tsp salt

100 gr unsalted butter

4 level tablespoons coconut flour

2 level tablespoons almond meal

1 tsp baking powder

1/2 tsp baking soda

3 tablespoons cocoa powder

Line your pan. Preheat your oven to 180 degrees Celsius or 350 degrees Fahrenheit.

Rise beans well and place in a bowl. Add the eggs, erythritol, stevia, vanilla and salt. Puree everything till fine.

In a separate bowl, beat the butter till creamy. Add a bit of the bean mixture and mix well. Keep doing this bit by bit till all the bean mixture has been added. (If you pour all the bean mixture in at one time, it will be harder to beat the batter till smooth and you will get little clumps of butter.)

Next add the coconut flour and almond meal, followed by the baking powder and baking soda. Mix well.

Pour half the batter into another bowl and add the cocoa powder. Mix carefully till the cocoa powder is incorporated.

Spoon half the white batter into your baking pan, half the chocolate batter, followed by the rest of the white and chocolate batter. Using a spoon, give the batter in the pan a couple of swirls.

Pop the pan into the oven and bake for 55min or till cooked (do the skewer test – if no crumbs adhere to the skewer, it’s done).

Nutritional Facts per serving if cake is cut into 15 slices:

Total cal – 114.7 kcal; Fat – 8.9 gr; Carbohydrates – 14.8gr (dietary fibre – 11.5 gr, therefore net carbs – 3.3 gr); Protein – 4.3 gr

Print this recipe – Low Carb Marble Cake

Low Carb Lemon Pound Cake

15 Mar

On 6 March I blogged about having my cake and being able to eat it. Unfortunately, I have been having my cake and eating it every day since then 😦 . I was so inspired by the Healthy Yellow Cupcake recipe that I  decided to try making other cakes using beans. Luckily, eating one slice does not require much insulin so I have been indulging myself.

I tried a lemon pound cake recipe I found on a blogger website using chickpeas. It was a total disaster. Not only did the cake fall to bits and pieces, it also had a chickpea taste. Had to bin the whole thing. Yes, yes, I know – if a cake is made of chickpeas, it should taste of chickpeas. But I’m not asking for the impossible here. I know: I want to use another ingredient and have it taste like something else. If you think of carrot cake or zucchini cake or the cupcake recipe above, it is possible! So lesson learnt quickly, I decided to play safe and go back to using white beans and to experiment on my own.

In my review of the Healthy Yellow Cake recipe as well as the chocolate cake recipe I tried, I wrote that both cakes stuck to the muffin liners leading to quite a bit of cake wastage. Also, on the first and second day after baking, there was a slight aftertaste from either the baking soda, baking powder or erythritol and the cake was a bit salty. I found that all this disappeared after two days and therefore recommended waiting and also using a topping to mask the taste. Since then, I’ve been experimenting and today, I think I hit the jackpot with my lemon pound cake which I’d now like to share with you. No aftertaste, no need for topping, no need to wait 24 hours for the beany taste to disappear or 48 hours for the aftertaste mentioned above to disappear. This is a cake you can start eating as soon as it has cooled, on the day of baking and in comparison to ‘normal’ cakes,  is still moist after 6-7 days left on the kitchen counter at room temperature. The room temperature in our home is around 21 degrees C. I don’t know what will happen in summer so it may be wise to put the cake into the refrigerator if you have space. I can’t tell if the cake will stay moist longer than 1 week as our cakes haven’t lasted longer than that. I do know that it is possible to freeze the cake without any problems. I think the successful outcome of any cake depends not only on the recipe but also very much on the brand of ingredients used. The recipe below came out perfect using the brands I bought and I hope that you will have success too!

Take a close-up look at the texture of the cake. Need I say more?

Before I give you the recipe, a tip about the baking pan. I noticed that all my baking attempts using beans stick badly. Whether I used paper muffin liners, a non-stick baking pan or generous buttering and even sprinkling the sides with almond meal, cakes made of beans seem to stick! However, the cake didn’t stick when I lined my pan with parchment paper! So make sure you line your pan with parchment. It is a bit of a pain to line the whole pan (base and 4 sides) with parchment so I did it the lazy way. I cut a piece that would cover both long sides and the base of the pan, buttered the pan generously and ‘stuck’ the parchment in place. That means that the two short sides were not lined but only buttered. After the cake was baked, I used a spatula to loosen the sides, the cake plopped out easily and the parchment peeled off nicely with no damage to the cake. So problem solved – cake wastage reduced.

I have an idea but haven’t been able to test it out yet. Using a silicon pan may be the solution. If it works, then I would be able to make muffins because right now, I think muffins create too much wastage.

Update – 5 Oct. 2011 – A silicon pan does work much, much better. If you have a silicon pan, forget the parchment.

Another tip – once you’ve added your baking powder and baking soda, don’t wait too long before putting the baking pan into the oven. The baking soda will start working and you don’t want the bubbles to deflate.

Note: if your stevia is dark brown, this may lead to a slight discolouration of your cake which in no way affects the taste. If this bothers you, add the walnuts so it will look like the discolouration comes from the walnuts!

Low Carb Lemon Pound Cake

1 420gr can (15 oz) white beans, 240gr when drained

5 large eggs

1/2 tsp stevia extract

1 tsp vanilla extract

1/4 tsp salt

95 gr (6 Tbsp) unsalted butter

1/2 cup erythritol

4 leveled Tbsp coconut flour

2 leveled Tbsp almond meal

zest of one lemon

1/2 tsp baking soda

1 tsp baking powder

Optional: 1/2 cup roasted, chopped walnuts

For Syrup

1/4 cup fresh lemon juice

2 tsp erythritol or more to taste

Preheat oven to 180 degrees C (350 degrees Fahrenheit). Line your baking tin.

Drain and rinse beans well. Puree with eggs, vanilla, salt and stevia.

Beat butter till soft. Add erythritol (I usually stir to mix a little before beating as I have a hand-mixer and bits tend to fly all over the place) and beat till well mixed. Add the bean mixture in two batches and mix again till smooth.

Next add the coconut flour, almond meal, lemon zest, baking powder and baking soda. After mixing well, pour into pan, tap it on the table counter to level off the batter in the pan and bake it for 50 minutes.

While the cake is baking, prepare the syrup. Squeeze your lemon, measure 1/4 cup and add the erythritol. Check and adjust sweetness.

Test the cake for doneness with a skewer after 50 min. and bake longer if necessary. The top of the cake will take on a lovely brown hue.

Remove the pan from the oven and poke lots of holes in the cake close to each other with a skewer. Drizzle the syrup all over the cake and leave it to cool.

If you have omitted the walnuts and slice your cake into 20 slices, then each slice has 2.9gr net carbs!!

…..

Nutrition Facts

If baked without walnuts and cut into 20 slices, then each slice has:

Total cal – 74.4 kcal; Fat – 5.7 gr; Total Carbohydrates – 9.3 gr (less Fibre 6.4gr = Net carbs 2.9 gr); Protein – 2.9 gr

If using walnuts, then add 0.4 gr carbs per slice.

…..

Print this recipe – Low Carb Lemon Pound Cake

Roasted, Salted, Paprika Almonds

3 Jan

I didn’t think I would be writing another recipe post so soon especially since I said in yesterday’s post – no camera, no photos = no recipe posts! Well, this recipe doesn’t really need a photo unless you don’t know what roasted almonds look like!! Okay, these are a little bit red. So just picture reddish, roasted almonds and you’ve got it.

You know how before Christmas, the magazine racks in bookstores and supermarkets are stocked with magazines featuring Christmas menus and homemade food gift ideas. Although I have lots of cooking magazines with more recipes that I could probably cook in my entire life, I still reached out and bought one – just for the heck of it and because I like giving people homemade food gifts made with love 🙂 and not loaded with chemicals and preservatives.

Did I make anything out of this magazine to give to someone? The answer is NO! Well… I did make something but I and my husband ate them all up!

I  spotted an easy recipe (being a bit lazy and always short of time, I usually look for quick, easy things to make). Of course, before giving something to someone, I had to test it out first to see if the recipe was worth its salt. Roasted, salted, paprika almonds  – packed in a nice jar, embellished with a ribbon and given with a bottle of good wine – sounds like a nice gift.

I made half a portion and wasn’t too impressed with the results. The nuts were slightly soft and didn’t seem to harden after cooling. The recipe said to place the almonds on a baking tray and sprinkle with salt and paprika powder. The salt didn’t stick onto the nuts and so they weren’t salty enough.  Getting the skins off the almonds was a pain and a wet affair. So I decided this wasn’t a good gift choice,  put the roasted almonds in a jar, into the cupboard and told my husband he could eat them (he calls himself our organic bin). He did – the day after and proclaimed them fantastic and said they weren’t soft at all. Indeed, the next day the almonds were all crunchy. Since I only made half the recipe, they didn’t last very long.

Now, almonds have the lowest carb count of all the nut varieties and are a nice snack on a low carb diet. The nutritional information on the package of raw almonds says 100grams has 630 kcals, 25.8 gr. protein, 4.4gr. carbs and 54.3g fat. Well, you’re not suppposed to eat 100gr at a time or at least, you should try your very best not to! The package gives 1 portion as 25 gr. and that is equivalent to about 23 almonds. So that’s 158 kcal, 6.5 gr. protein, 1.1 gr carbs and 13.6 gr fat. Okay, that’s before baking and the egg white, salt and paprika have not been factored in but it isn’t much.

I then decided to rework this recipe – can there be anything to rework? – it’s so simple – have now made it 4 times and think that this is a super homemade snack for the low carb dieter.

Update 5 May 2019 – I’ve come up with a better, very addictive solution. Just bake the peeled almonds for 10-12 min at 200 degrees C. (Check after 10 min.) Forget the egg white, salt and paprika. However, if you are making a gift, the red paprika looks quite nice. The bad thing is – these are so good I can’t stop eating them. Here is a photo of the plain, roasted almonds. I haven’t made the paprika almonds again for a long time.


This recipe for roasted, salted, paprika almonds comes complete with all the adjustments I’ve made.

Roasted, salted, paprika almonds

400gr raw almonds

1 egg white (M size)

Salt, paprika powder

Bring a pot of water to boil and throw in the almonds. Boil 1 minute. When the water is boiling, turn off the heat and put in the almonds. Let them sit for one minute. Take out one almond and check if the skin comes off easily when squeezed. If yes, drain and rinse quickly with cold water. If not, boil wait 10-30 seconds more. Drain and wait for a while to let cool and for the excess water to drain off. If you peel them too soon, there’ll be a lot of brown water squirting around.

Squeeze the almonds out of their skins and lay on a paper kitchen towel to soak up the excess water. If they still look wet once you’ve peeled them all, take a paper kitchen towel and pat them dry.

Break an egg white into a mixing bowl and use a fork to beat it so that it increases in volume and becomes white and frothy. Add the almonds and salt as desired (I use 1 1/2 tsp). Stir well to coat.

Pour out the almonds onto a baking sheet lined with parchment paper. If there is any egg white at the bottom of your bowl, don’t pour it out onto the baking sheet.

Spread the almonds out making sure there is only one layer.

Sprinkle the almonds with paprika powder.

Bake in a preheated oven at 200 degrees Celsius (180 degrees convection oven) for 14-15 minutes.

Take out and let the almonds cool. The almonds will start crackling as they cool!

Notes:

  • I’ve noticed that if I boil the almonds too long, this makes them soft after baking and not all of them will dry up and become crunchy. I found 2 minutes boiling too long. I had to rewrite this tip cos the batch I made yesterday were still soft today despite boiling for only one minute. I found a site on the internet which said not to boil the almonds but just cover in hot water. Maybe that might do the trick. What I just did to the soft almonds was put them back into the oven till they hardened up. They’re ok now. I really hate recipes which don’t tell you everything!
  • if you don’t want your almonds spicy hot use sweet paprika powder, otherwise try it with hot paprika powder
  • 1 medium egg white is enough to coat 400gr almonds without having too much excess egg white on your baking sheet. If there is too much egg white, your almonds may end up stuck together (but this isn’t really a problem as you can break them up). If you use 500gr almonds, then use the egg white from a large egg
  • 400gr almonds will fill up your oven’s baking sheet, so if you make more, you will probably have to bake in two batches. I also don’t recommend making more otherwise your fingers will be sore from peeling. It took me about 25 minutes to get off the skins one by one. That’s why I don’t want to make these for anyone. This is bloody hard work!
  • I am not sure why the recipe calls for unpeeled almonds and not blanched, peeled almonds since these are readily available. You could save yourself a lot of trouble by buying blanched almonds. Maybe it’s the price factor. Here in Germany, they cost more than double the price.
  • I find it easier and better if I put a teaspoon of paprika into a little sieve and then sprinkle onto the almonds
  • The second time I made these, they were over roasted although I baked them for the same time. Maybe it was because they were boiled for a shorter time and were therefore soaked with less water. So check during the last few minutes.
  • adjust the amount of salt according to your taste in the next batch. I don’t like mine too salty as it makes me really thirsty after eating
  • try the same recipe with finely ground chili, curry powder or garam masala. I haven’t yet but the magazine recommended it. You can also do this with peanuts, cashews, macadamias or pecans although the carb count is higher.

Hope you like these.

Print this recipe: Roasted, salted, paprika almonds

Muffins, muffins, muffins

10 Jun

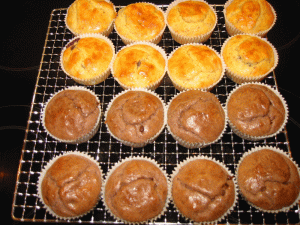
Blueberry Muffins (top) and Chocolate Chip Muffins (below)

What is it with this low carb diet? I am always hungry! So I’ve been thinking of things to make which are low carb so that I can satiate those hunger pangs.

I found an almond cake recipe on the internet, made some changes and turned them into muffins. On my second try, I’ve added blueberries to one batch and chocolate chips to another batch.  No additional sweetener is added because the designer whey I use already contains a sweetener and I find this is enough.

Update 10 Mar 2011 – when I first started my low carb diet I thought these were great but I’ve changed my mind now. I’ve found an even better recipe using white beans. See my post on 6 Mar 2011.

Here are 3 variations of Almond Muffins.

Almond Muffins (Basic Batter)

makes 9 muffins (not pictured but they look like the blueberry muffins)

50 gr Butter

100 gr cream cheese

2 large eggs

100gr almond meal

1 tsp baking powder

20gr vanilla flavoured protein whey

1 packet lemon zest (this gives it some flavour and masks the protein whey taste – I use ESN Designer Whey which I have decided I don’t like at all but I have 2 kg to get rid of!)

Melt the butter and stir in the cream cheese till well blended. Next beat in the eggs one by one. Add the almond meal, protein powder, baking powder and lemon zest. Mix everything well. Portion into 9 well-greased muffin cups. Bake at 175 degrees Celsius for 20 minutes. Let cool before removing from tin.

Nutrition Facts: Calories per muffin – 167.8 kcal; Fat – 15.2 gr;  Cholesterol – 76.1 mg; Total Carbohydrates – 3.2 gr; Protein – 6.1 gr

Blueberry Almond Muffins

Use the recipe above, omit the lemon zest and add 1/2 tsp vanilla extract.  Portion the batter into 9 muffin cups and drop in 5 fresh blueberries per muffin. (Note: fresh blueberries are heavy and sink to the bottom. You can try with frozen blueberries – 1 tsp full per muffin.)

Nutrition Facts: Calories per muffin – 171.1 kcal; Fat – 15.2 gr;  Cholesterol – 76.1 mg; Total Carbohydrates – 4.1 gr; Protein – 6.2 gr

Chocolate Chip Muffins

Use the Almond Muffin recipe above.  Omit the lemon zest. Instead of vanilla flavoured protein whey, use chocolate flavoured protein whey if you have. If not, vanilla is ok. Add 1/2 tsp vanilla extract, 1 Tbsp unsweetened cocoa powder and 50 gr chocolate chips. Yes, the chocolate chips do contain sugar but the sugar works out to around 2.8gr for 9 muffins.

Nutrition Facts: Calories per muffin – 198.3 kcal; Fat – 17.5 gr;  Cholesterol – 76.1 mg; Total Carbohydrates – 6.5 gr; Protein – 6.6 gr

I’ve frozen my muffins and I am now ready for any hunger pangs which may arise the next couple of weeks. 🙂

WARNING! – these muffins are low carb so don’t expect them to taste like the stuff you make with sugar and flour.

Print these recipes: Muffins – 3 variations

Soy good!

10 May

In my earlier post today (scroll down), I talked about buying tofu at the Asian supermarket. So this post will feature a tofu recipe – not with the tofu I bought there but with some I bought at my local organic supermarket. There is a company called Taifun, located in Freiburg im Breisgau in the Black Forest which makes tofu – not only plain tofu but tofu in all its variations. Since trying their products, I have become a fan. I love tofu now. I didn’t like it when I was a kid but I love it now.

Tofu is rich in Omega-3 fat and calcium.  It has been extolled as a source of inexpensive and high-quality protein, with anti-carcinogenic, antioxidant and cholesterol-lowering properties. Of course, there may be some people who are allergic to tofu, just as there are people who are allergic to a host of other things, but if you have no problems with it, tofu is low in carbs and can be used widely in a low carb diet.

There are some concerns that too much tofu may lead to brain aging and finally to Alzheimer’s but this study has been disputed. Tofu is commonly eaten all over Asia in much larger quantities than in the West. If these concerns are true, all the old people in Asia would be suffering from Alzheimer’s disease by now and I am sure this relationship would have been discovered a long, long time ago. Well, I’m not going to throw tofu out of my diet.

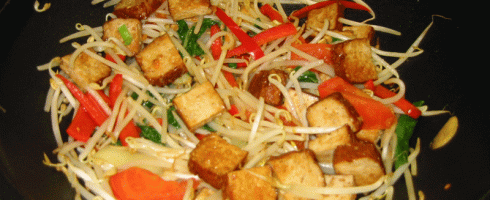
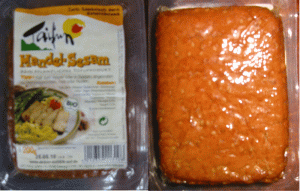
Today’s lunch was an Almond-Sesame Tofu and Vegetable Stir-fry pictured above. I’ve used beansprouts, pak choi and red cubanelle peppers but you could just about use any typical stir-fry vegetable. This is the tofu I used in the recipe – almond-sesame tofu (3.3 gr carbs per 100gr). It is my favourite of all the tofu from this company. Put it in anything and you’ll have a great dish!

Almond Sesame Tofu from Taifun

Almond-Sesame Tofu and Vegetable Stir-Fry (serves 2)

200gr Almond Sesame Tofu or other flavoured tofu, cut into cubes about 2cm by 1cm (1 in by 1/2 in)

4 cups bean sprouts, picked over

1 red cubanelle pepper, cut into strips

200gr pak choi, cut into big pieces

1 tomato, cut into eight pieces

2 cloves garlic, sliced

1 stalk green onion, cut into 6cm (2 in) lengths

1 tsp sesame oil

soy sauce to taste

1 Tbsp vegetable oil

Heat the oil in a wok or large frying pan. Add the tofu and fry gently till brown. Remove to drain on a paper kitchen towel.

Add the garlic to wok and fry till fragrant. Add all the veggies and green onions EXCEPT the bean sprouts and stir-fry for a few minutes till the peppers and pak choi stems are cooked. Add the bean sprouts and stir-fry for about 2 minutes. You only want them cooked to the point where they still retain a bit of their crunch.

At this point, put back the tofu. Toss and then sprinkle with sesame oil and soy sauce to taste. For a nice touch, sprinkle with some toasted sesame seeds.

Approx. nutrition facts since veggies are estimated (without toasted sesame seeds) – per serving 296.8 kcal; Fat 13.7 g; Cholesterol 0.0 mg; Sodium 982.5 mg; Carbohydrates 18.2 g ; Protein 29.3 g

Print this recipe: Almond Sesame Tofu and Vegetable Stir-fry

This is more than the 12gr allowed under the Bernstein diet but I’ll save elsewhere to compensate.